
Many beginners ask, "How should I play the handpan?" Learning to play the handpan is not the most challenging task. Have you got a new handpan? Or are you considering acquiring one? If you need help playing the handpan, it's time to join our free online handpan courses.
Compared to other musical instruments, the handpan has fewer notes, offers excellent freedom in playing, and can be easily mastered by learning numerical position marking, even for players without a musical background. Of course, with some practice, playing with musical notation will become second nature.
It's worth mentioning that the emergence of the handpan has broken the traditional limitations of percussion instruments. It can produce melodies (including harmonics and semitones) and rhythms, allowing for the experience of soothing music and upbeat songs. By completing the online courses, anyone can become a professional. This guide aims to determine the speed (time and stages) at which an individual can learn to play the handpan.
Quick Handpan Online Courses
Learning Handpan: A Step-by-Step Guide to Mastering the handpan
Our handpan online courses contain three sessions that help beginners learn how to play the handpan correctly and quickly. These online courses cover the correct methods and considerations for playing the handpan. Completing the three courses takes about 15 minutes. Yes, you read that right! Regular practice and keen learning are the two most effective ways to become an excellent handpan player. Learning the handpan in a short period is possible.
Once you understand the notes of the handpan, you can automatically determine the scale. The online handpan courses cover essential topics such as how to position yourself, the handpan, and where to strike the notes. The playing position of the handpan plays a critical role in producing a good tone.
Are you a beginner or already have some ideas? In the initial training, you will learn simple handpan techniques and the playing of primary rhythms. You can advance to the intermediate course after completing the introductory handpan course online. Most courses cover the 4/4 rhythm, which is joint and a great starting point. Developing the ability to play primary rhythms is the best way to get a good start. The rhythm of the handpan determines the sound and tempo of the music. Once you master the rhythm, you can have a different experience.
Choosing a Comfortable Playing Position
- Place the handpan flat on our legs (cross-legged) for seated playing.
 2. Place the instrument flat on the handpan stand and secure it.
- If the stand is shorter than 60cm in height, you can choose a suitable stool to sit on while playing the instrument.
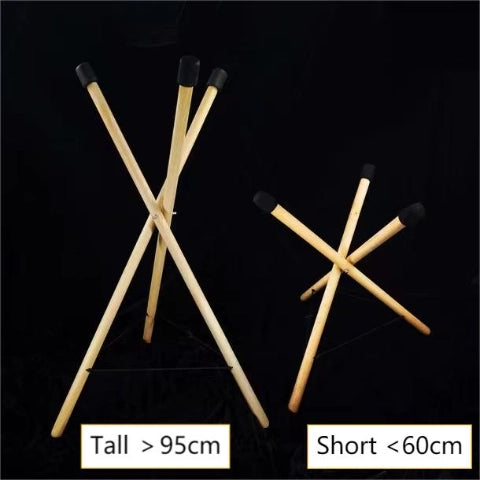
- If the stand is taller than 95cm, it is recommended that you stand while playing the instrument.

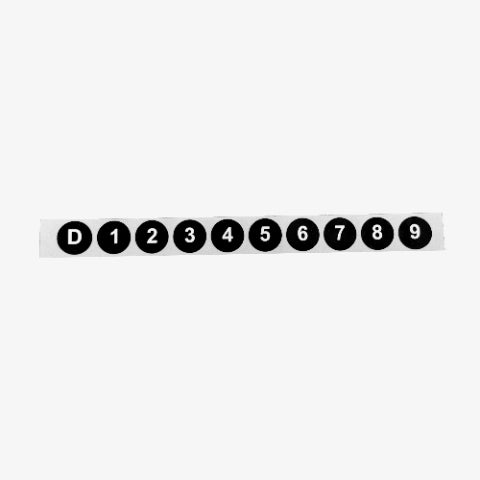
Prepare Numbered Note Stickers
Reliable handpan brands typically provide them; if not, try purchasing or making them yourself and applying them to the corresponding positions before practicing.
Before playing, rotate the instrument to adjust the arrangement of the tone fields so they are in a position ready for performance.
Align the two largest low-tone fields (A3 and Bb3) directly before you, as shown.

How to Apply Numbered Stickers Corresponding to the Tone Fields?
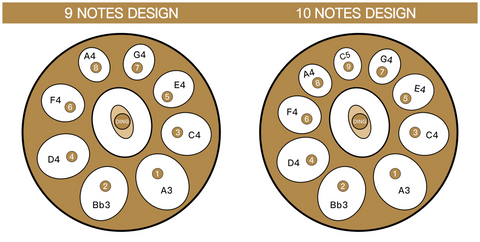
We will use the D minor scale with 9 and 10 notes as an example for beginners:
- Nine notes:
- The note sticker 'D' will be placed on the instrument's 'Ding' (D3) tone field.
- The note sticker '1' will be placed on the instrument's 'A3' tone field.
- The note sticker '2' will be placed on the instrument's 'Bb3' tone field.
- The note sticker '3' will be placed on the instrument's 'C4' tone field.
- The note sticker '4' will be placed on the instrument's 'D4' tone field.
- The note sticker '5' will be placed on the instrument's 'E4' tone field.
- The note sticker '6' will be placed on the instrument's 'F4' tone field.
- The note sticker '7' will be placed on the instrument's 'G4' tone field.
- The note sticker '8' will be placed on the instrument's 'A4' tone field.
As shown in the figure.

- Ten notes:
- The note sticker 'D' corresponds to the 'Ding' (D3) tone field.
- The note sticker ‘1' corresponds to the ‘A3' tone field.
- The note sticker ‘2' corresponds to the ‘Bb3' tone field.
- The note sticker ‘3' corresponds to the ‘C4' tone field.
- The note sticker ‘4' corresponds to the ‘D4' tone field.
- The note sticker ‘5' corresponds to the ‘E4' tone field.
- The note sticker ‘6' corresponds to the ‘F4' tone field.
- The note sticker ‘7' corresponds to the ‘G4' tone field.
- The note sticker ‘8' corresponds to the ‘A4' tone field.
- The note sticker ‘9' corresponds to the ‘C5' tone field.
As shown in the figure.

After preparing these pre-playing steps, we can start our quick online handpan course.
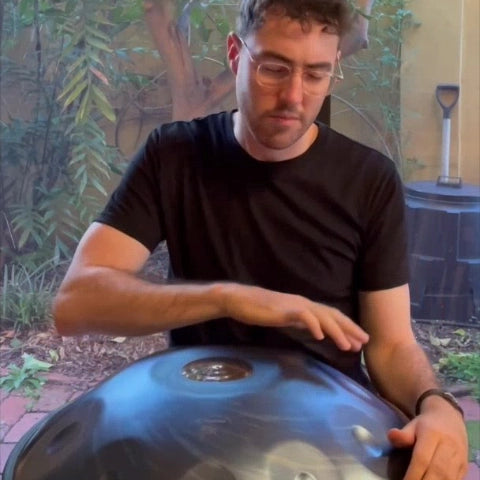
The video contains several essential aspects to note:
Which Part of the Finger to Use for Striking?
- Begin with bare index finger playing techniques.
We recommend starting with basic index finger techniques for beginners. Use the most flexible part of the index finger's first joint (fingertip) to gently strike the resonant parts of the tone fields. New players should persist with this practice for 1-3 days. After consistent practice, your index finger becomes more flexible, and your instrument striking becomes more intuitive and responsive.

2. Try playing with the thumb to improve gestures and coordination when alternating between hands.
Indeed, after a few days, many players will attempt to expand their practice to other fingers. At this point, most players choose to use the thumb. Like the index finger, playing with the thumb requires using the most elastic part, the first joint. We do not recommend beginners start playing with the thumb immediately, as it is harder to produce sound than the index finger.
Many performers seen in various videos playing enchanting music with one hand using their thumb often have over five years of playing experience. For beginners, practicing with the thumb primarily aids in wrist rotation, familiarizes them with the positions of the tone fields, and enhances coordination and flexibility when playing with both hands simultaneously.
Why Doesn't My Strike Produce Sound or Sounds Bad?
Many new players, beginners, and even experienced musicians who have just started with the handpan often need clarification on why they can't produce beautiful sounds, leading them to doubt the quality of the instrument. You may be adept at playing various other musical instruments, but with the handpan, everything represents a new beginning.
For most beginners, waiting to produce the desired sound is entirely normal. This phenomenon, in most cases, is not due to the poor quality of the instrument. Besides the inaccuracies in finger placement mentioned earlier, getting familiar with and mastering the following skills can perfectly address these concerns:
- The most fundamental reason is that, during playing, your fingers or palms press down on the metal surface of the instrument (i.e., the sounding part of the tone ring), preventing the metal plate from vibrating—the brief duration of vibration results in the inability to produce sound or a muffled sound. The principle of 'vibration produces sound' is often overlooked by beginners because they need to familiarize themselves with the materials and structure of the musical instrument.
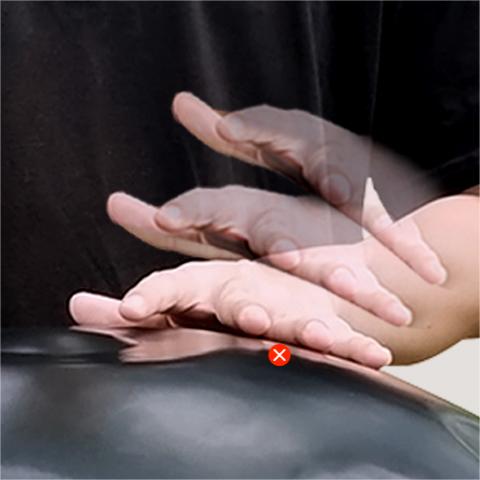
Use the fingertips to tap instead of the palm to prevent pressing against the metal plate
2. Use the fingertips to tap instead of the palm. Based on the above principle, only the most elastic part of the fingertips (the first joint) is in direct contact (tapping) with the metal plate of the instrument's tone ring when playing, whether with the left or right hand. Quickly withdraw the fingers to allow sufficient vibration of the metal plate, producing sound. Please avoid using the palm to form a surface-to-surface contact with the metal plate, as this will result in the palm pressing on the tone ring, causing it not to produce sound or sound muffled.

Tap with the most elastic part of the fingertip and quickly pull the finger away
3. When tapping, the force point for the "flicking" motion of the fingers is in the wrist rather than the forearm or palm. By exerting force from the wrist, the finger movements are light, agile, and conducive to tapping with the most elastic part of the fingertips and quickly withdrawing the fingers. After practicing multiple times, you will find the sensation of "fingers automatically rebounding and quickly leaving the hand," indicating that success is not far away. If force is applied from the forearm and palm, the movements will be stiff and slow, appearing mechanical and clumsy. At this point, compare the differences between the two movements by moving your hands, and you will immediately feel a distinct tapping experience.
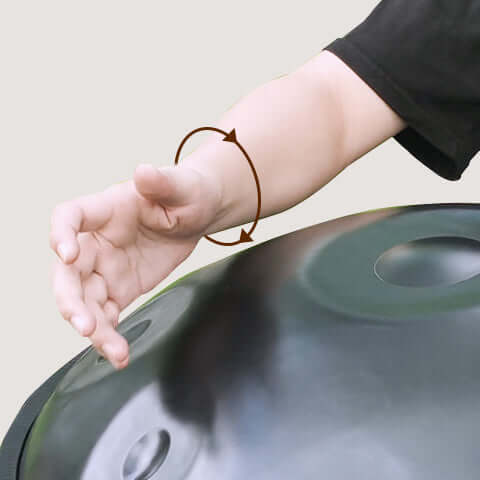
By exerting force from the wrist
4. It is essential to emphasize using wrist force when playing with the thumb or alternating between the left and right hands. Wrist force permeates the flexibility of your entire body. If you use the palm or forearm for force, you may either fail to produce sound or risk bodily imbalance, making it difficult to reach the distant tone rings.
To strike which parts of the instrument?
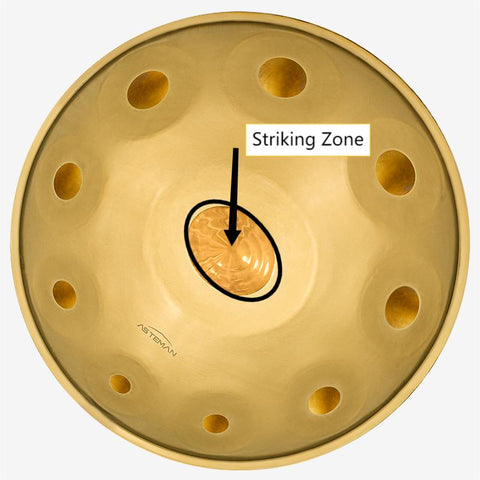
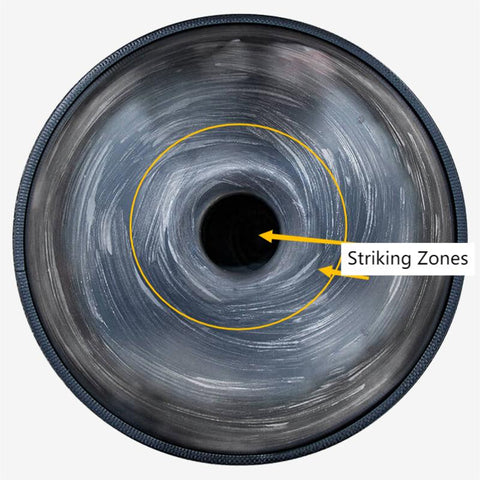
- The "Ding" Tone:
In most brands of handpan instruments, the "Ding" tone is located in or near the center. The instrument may consist of one, two, or even three layers, depending on the design. The optimal striking area for the "Ding" tone is the most prominent point on the top layer's center.
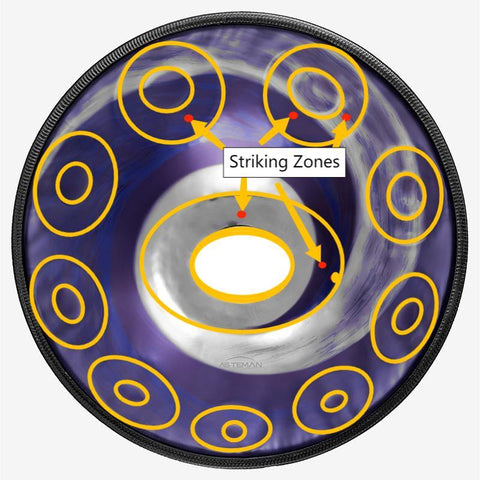
2. Circular tone fields around the "Ding" and other tone fields:
Aside from the "Ding" tone, the best striking areas are the circular tone fields surrounding it. The circular tones around the "Ding" tone, specifically the fifth and octave overtones, produce overtones. Other circular tone fields, such as "A, Bb, C, D, E, F, G, A, C," also have overtones. Due to the instrument manufacturing process, the circular areas around the "Ding" tone and other tone fields undergo high-intensity softening, making it easier to produce sound and more accurate pitch compared to different areas of the instrument. When they first get the instrument, many new players tend to strike the concave circular area in the middle of ordinary tone fields with a mallet. While this produces sound, there are better striking areas than this, and it is not recommended due to its lower softening and pitch adjustment compared to the circular area.
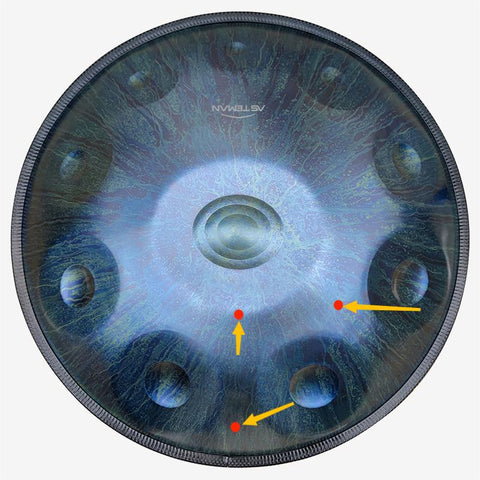
3. Apart from the mentioned areas, there are many player-created sound marks and playing techniques within the handpan industry. Interested players can continue to explore these. Typically, striking these areas produces the natural sound of the instrument material, known as the "sound of steel." In the hands of advanced players, especially when playing fast-paced melodies, these sounds can serve as accompaniment and add unique sonic effects to the music.
4. At the bottom of the instrument, there is a circular or elliptical hole called the "Gu." The "Gu" and its surrounding areas can also be played, but unlike other sound regions, they have not undergone softening and tuning. Instead, they are designed based on the principles of Helmholtz resonators. Advanced and creative players usually use their palms to strike the "Gu" and the surrounding areas to bring more joy to the music. Beginners and intermediate players rarely engage with them.
Rhythm Practice
Are you eager to quickly get started by gaining a certain level of understanding of the instrument and playing skills? Then, the next step is to commit to a certain number of beat exercises, deepening the impression of sound areas, improving the proficiency of playing, and enhancing the coordination of movements through continuous repetition. Before practicing the beats, let's review and double-check all the positions of the tone fields and ensure that the numbered stickers are in their correct positions.
Please cross-verify and rectify based on the schematic diagram provided below.
With everything in readiness, we will now proceed to rhythm practice.
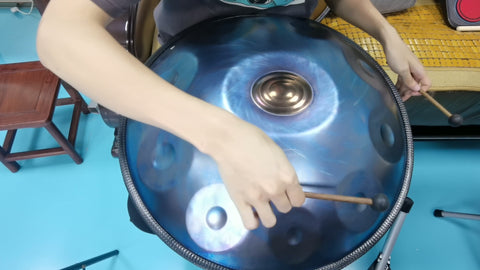
- Learning to Play the Handpan with a Single Hand
- Train single-handed repeated strikes on a fixed sound area.
For example, you can practice using the tip of your right index finger to continuously strike the C4 tone field (number sticker "3") for a short period. Using the same method, practice using the tip of your left index finger to strike the D4 tone field (number sticker "4") continuously for a short period.
- Train single-handed sequential strikes on each sound area.
For instance, you can practice using the tip of your right index finger to start from the A3 tone field, progressing through "Bb3, C4, D4, E4, F4, G4, A4, Ding," repeating each tone field for 30 seconds (from number sticker "1" to "2, 3, 4, 5, 6, 7, 8, Ding")—similarly, practice with the tip of your left index finger.
- Train single-handed alternating strikes between adjacent sound areas.
For example, practice using the tip of your right index finger to alternately strike the Bb3 and C4 tone fields (number stickers "2" and "3") to familiarize yourself with this cross-playing sensation. Use the same method to practice with the tip of your left index finger.
- Train single-handed alternating strikes between any two farthest sound areas.
For instance, practice using the tip of your right index finger to alternately strike the A3 and A4 tone fields (number stickers "1" and "8") to familiarize yourself with this cross-playing sensation and enhance finger flexibility. Use the same method to practice with the tip of your left index finger.
2. Learning to Play the Handpan with Both Hands
- Train both hands to repeatedly strike adjacent sound areas (one with the right hand and one with the left hand).
For example, practice using the tip of your left index finger to strike the A3 tone field (number sticker "1"), followed by the tip of your right index finger hitting the Bb3 tone field (number sticker "2") back and forth, maintaining a steady rhythm. Repeat this exercise for one minute—similarly, practice with the thumbs of both hands.
- Train both hands to strike each sound area sequentially (the right hand first, followed by the left hand).
For example, use the tip of your right index finger to repeatedly strike A3 (number sticker "1") for five seconds, then use the tip of your left index finger to repeatedly strike Bb3 (number sticker "2") for five seconds. Continue this sequence with C4 "3" (right), D4 "4" (left), and so on, up to A4 "8" (left), practicing for five minutes—similarly, practice with the thumbs of both hands.
- Train both hands to strike two adjacent sound areas alternately.
For example, practice using the tip of your left index finger to alternately repeat strikes on the Bb3 tone field (number sticker "2") and the tip of your right index finger to alternately repeat strikes on the C4 tone field (number sticker "3"). Repeat this exercise with one set from A3 (number sticker "1") to D4 (number sticker "4") continuously for 5 minutes—similarly, practice with the thumbs of both hands.
- Train both hands to strike any two sets of sound areas farthest apart alternately.
For example, practice using the tip of your left index finger to alternately repeat strikes on the Bb3 tone field (number sticker "2") and the tip of your right index finger to alternately repeat strikes on the G4 tone field (number sticker "7"). Repeat this exercise with one set from A3 (number sticker "1") to A4 (number sticker "8") continuously for 5 minutes—similarly, practice with the thumbs of both hands.
Through these beat exercises, after consistently practicing for 3-5 days (players with many practice sessions, music background, or natural talent may achieve this in 1-2 days), most beginners can memorize the distribution of tone fields, develop a preliminary sense of touch between fingers and the instrument, play sounds, and coordinate the simultaneous use of both hands while finding the rhythm in their performance.
Avoid Causing Damage to the Instrument During Performance
We understand that the handpan is a costly instrument, often acquired after significant savings. Its high cost is attributed to its all-metal construction, meticulously handcrafted with each tone field painstakingly hammered by artisans. Numerous factors can potentially damage the instrument, with physical harm being the most formidable.
- Test the sound with a mallet.
Upon acquiring the instrument, gently strike the optimal striking area with a mallet if it does not produce sound initially. Avoid reckless pressing or forceful striking, which may cause irreversible physical damage or misalignment.
2. Control hand strength and striking points, aiming for gentle touches.
During single-handed practice, avoid swinging your arm and using mechanical force to press on the metal surface; instead, use the fingertips. Many players with prior skills can quickly adopt this technique.
3. Ensure the stand supporting the instrument is sturdy and reliable during the performance to prevent accidental drops.
4. During performance, avoid collisions and prevent rings and fingernails from scratching the instrument's surface.
5. Do not place the instrument in elevated locations to prevent accidental falls, avoiding potential injuries to others or children.
6. Remember not to place it directly on a hard surface when you intend to engage in practices like meditation, mindfulness, yoga, or any training that involves sitting with the instrument. Instead, place a soft cushion underneath, such as a meditation cushion, to prevent damage to the instrument.

Apart from safeguarding against physical damage, consider the influence of temperature and humidity:
- Keep it away from heat sources. Avoid exposing it to extreme cold; store it in a carrying case instead.
- Store the handpan in a dry, well-ventilated area to prevent moisture absorption.
- Avoid direct exposure to sunlight.
- If possible, invest in a specialized handpan thermal case to protect against extreme cold and heat.

Lastly, corrosion prevention is crucial:
- Avoid contact with corrosive liquids like detergents.
- Do not wipe corrosive maintenance oils on the instrument's surface.
- Hand sweat may cause rusting. After playing, clean the instrument's surface with a soft cloth to prevent sweat from corroding the metal. For regular practice, especially with nitrided steel instruments, apply maintenance oil at least once a week.
- If planning not to use the instrument for an extended period, apply maintenance oil to the surface and store it in a backpack with thick material at room temperature.
In conclusion, the handpan can be likened to a "delicate child," requiring care and attention similar to one's offspring.
Trying to Play a Melody
The primary goal of the crash course we have previously covered is to memorize the positions and meanings of the tone fields, achieve accurate pronunciation, and develop a basic sense of rhythm (beat) during handpan playing. Ultimately, the aim is to perform a complete melody. Now, let's follow the guidance of teacher Ravid Goldschmidt to play a segment of his composition, "Fall."
Are you interested in joining this new trend? Playing the handpan with both hands is a modern fashion. It takes some time to practice, and if you want to develop your skills, you can inquire about new techniques from your teaching expert. You can also use foundational knowledge to enhance your hand techniques.
This online handpan courses allow students to play percussion techniques at different speeds and movements. This course helps teach students how to achieve smoother transitions by learning challenging techniques. Do you find yourself irresistibly drawn to playing the handpan when you have it in your hands?
Join the Handpan Online Course now and become a handpan expert in just one week. For beginners, you can participate in our free beginner's course. By taking these online courses, you can better understand the handpan than you would have otherwise.
At the end of the article - More Exciting Content Recommendations
- Recommended article: 'How to Choose Your First Handpan?'
- Choose an instrument from the collection of exquisite handpan musical instruments showcased in the article images.
- Watch more handpan performance videos and beginner courses.


